This information is archived from the time of the August 2017 total solar eclipse. While it may be useful to some readers, the latest instructions incorporate improvements sug-gested by readers and offer simpler materials and methods of construction for some of the viewers. Visit the latest pages here. LINK
Get Ready for the
August 21, 2017 Total Solar Eclipse
No Telescope? Not a Problem!
Make Your Own Safe Solar Viewer (SSV),
A Project for Kids of All Ages at a Cost of from 1 to 20 Dollars.
T. R. RichardsonCollege of Charleston Department of Physics and Astronomy
This project was made possible thanks to the generous support of
The American Astronomical Society,
The National Science Foundation,
The College of Charleston School of Sciences and Mathematics and
The Department of Physics and Astronomy
The viewers depicted on these page are part of the Eclipse Science Ambassador Project
based at the College of Charleston Department of Physics and Astronomy.

Figure 1. This is
the latest prototype of our Safe Solar Viewer (SSV). It
is not a telescope so you cannot look though it.
Optically it is a crude ultra-long focal length
telephoto lens with the film or CCD replaced by a white
card. You observe the Sun by looking at the projected
image. This viewer produces a 3-inch image of the Sun.
It is constructed with $5 of surplus optics (LINK),
pieces of plywood, a tongue depressor, cardboard, rubber
bands, screws and glue.
x
This document details
everything needed to make a Safe Solar Viewer (SSV).
Two types of projection viewers are described, a
simple one costing less than $1 and a more elaborate
one that can be made for twelve to eighteen dollars
depending on the items you have on hand. (The optics
for the second viewer sell for $5 plus shipping at the
time of this writing.) The viewers depicted on these
pages are part of the Eclipse Science Ambassador
Project, a public outreach effort based at the College
of Charleston Department of Physics and Astronomy.
Before we write about viewers, the next section is a
reminder about eclipse eye safety.
x
At the time of a solar eclipse
it is important to avoid eye damage by using proper
observing techniques during the partial phases of the
eclipse. Many people know it is unsafe to look through
a telescope at the partially eclipsed Sun. Some do not
realize that it is also dangerous to look directly at
the partially eclipsed Sun unless a safe solar filter
or some other technique is employed. The late partial
phases of the eclipse magnify this danger. One of the
safest ways to view the partial eclipse phases is to
project an image of the Sun onto a white surface. This
approach allows several people observe at the same
time. Below we give the directions for constructing
two types of solar projection viewers.
x
All that is needed for the optics is a lens from +1 reading glasses. We purchased ours for $1.00 at Dollar Tree. (A +1 close-up camera filter is just a +1 diopter lens and +1 reading glasses contain two such lenses.) These lenses have a focal length of about 1.0 meter (39.4) and produce a magnified image of the sun about 1 cm across, easily large enough to show the partial phases of a solar eclipse very well.
Next find a box or tube long enough to hold the lens at one end and a piece of white paper at the other end exactly one focal length away from the lens. Stores like Kinko's have dumpsters that are good places to find such items. In the past we used a cardboard tube but a box (or cardboard you fold into a long skinny box) is easier to make and use. (See Figure 2a.) Attach the lens to an opening cut in one end. We determined by trial and error that the hole should be about ⅜ inch across. Much larger than this and the solar image is too bright. Tape white paper inside the box at the other end. Once you have done that your simple SSV is finished and ready for use.
With this SSV you can simply lean the viewer against a bench or other object at the correct angle so that the image of the Sun falls on the screen. You can also use a +2 lens to make a shorter SSV. with a +2 lens that produces a solar image of the Sun and the device is only about 20 inches long but the image is smaller at about three sixteenths of an inch. If you stand with your back to the Sun and the SSV on your shoulder, you can practice using the shadow of the SSV on the ground to aim your viewer at the Sun. When the shadow of the tube or box is the smallest, the SSV is pointed at the Sun and an image of the Sun will appear on the viewing screen. It is quite practical to have this viewer on your shoulder with the Sun behind you. That way you show the solar disk to people facing you. See Figure 3a.


Figure 2b. The original box was 5
inches thick by 14 inches wide and 56 inches long. We
kept the 5 inch width and ended up with a box 5 by 5
by 56. Then we cut off the end to make a focuser from
the excess length and mounted the reading glass lens
in the end of the focuser. As shown in Figure 2a, the
focuser can be slid up and down the box and is held in
place by binder clips.
 |
Figure 2c.
Here we see one half of the reading glass lens
still in the frame and taped to the front of the
focuser. It is usually easy to pop the lens out
of the frame if you wish to mount it in some
other way. As shown we left the +1 diopter
indicator in place. The rhinestones in the lens
frame are not functional. The hole for the light from the lens does not need to include the entire lens and in practice a better image is formed if the hole is kept to about a quarter inch or a little more in size. A large hole makes an image that is too bright and indistinct for the best viewing. |
| Figure
3a. Here we see a solar viewer held on the
observer's shoulder so it can be seen by those
people standing around the person holding it. It
is a simple matter for someone to stand with the
Sun at their back and match the shadow of the
box to the viewing screen. With a little
practice it is easy to bring the Sun into view
and with the single lens SSV it is relatively
easy to keep the Sun always in view. We have found these viewers are excellent for observers who are wheelchair bound or lack mobility so that they need observe the entire eclipse while seated. The only problem using the SSV this way is a person's hair can sometimes block the view. |
 |
 |
Figure 3b
Here we show the objective of the 1-lens SSV
made with a +1.5 diopter reading glass lens. The
hole is deliberately smaller than the lens for
two reasons. Using the full lens produces an
excessively bright image that is difficult to
view and a small hole (about 3/8 of an inch)
produces a much sharper image. |
x
We have made these SSVs from
reading glasses from +1/2 to +2. The fractional power
reading glasses are more difficult to find (though
they do produce large images) and the viewers are very
long (often more than 6 feet) and so we have ignored
them in Table I below. This table shows the lens
power, the length of the viewer and the solar image
size.
Table I 1-Lens SSV Sizes (approximate values) |
||||
|
|
||||
| Power (diopters) |
Focal Length inches |
Solar Image inches |
||
|
|
||||
| +1.00 |
39 |
0.40 | ||
| xxx | ||||
| +1.25 |
32 |
0.31 | ||
| xxx | ||||
| +1.50 |
26 |
0.26 | ||
| xxx |
||||
| +1.75 |
23 |
0.22 | ||
| xxx |
||||
| +2.00 |
20 |
0.20 | ||
|
|
||||
x
With just a little more work and
expenditure of funds you can construct your own SSV
that will project an image of the Sun two inches or
more across. This SSV is just like the one shown in
Figure 1 above. This viewer needs two lenses of the
right kind, a support for those lenses, a white
screen, and a method of adjusting the distance between
the lenses Here we provide the details of our
particular viewer but a wide variation in parameters
will still result in a working design.
x
This viewer needs an objective
lens with a focal length of anywhere from 600 mm to
400 mm. We used a 500 mm lens costing $1.50 plus
shipping. (At the end of this document we provide all
the lens details including suppliers, catalog numbers,
etc.) Lenses shorter than 400 mm also work but the
initial solar image produced is so small it tends to
burn the wooden support or the cardboard lens holder.
If you have a +2 close-up camera filter, you can use
it since its focal length is about 500 mm but you will
get better image quality if you cover the filter using
cardboard with a hole about an inch or a little more
in diameter.
The second lens is called a Barlow. It magnifies and projects the image of the Sun. Any good -18 mm to -30 mm focal length lens will work but that kind of lens is not something people usually have around the house. If you lens has a different concavity on the two sides, we orient the side with the deepest curve toward the Sun. In the Eclipse Science Ambassador workshops the children are using a -27 mm lens as the Barlow. We ordered ours online from Surplus Shed. (Details are at the end of this document.)
The second lens is called a Barlow. It magnifies and projects the image of the Sun. Any good -18 mm to -30 mm focal length lens will work but that kind of lens is not something people usually have around the house. If you lens has a different concavity on the two sides, we orient the side with the deepest curve toward the Sun. In the Eclipse Science Ambassador workshops the children are using a -27 mm lens as the Barlow. We ordered ours online from Surplus Shed. (Details are at the end of this document.)
x
The exact distances here are
not that important because many different combinations
will work; however, the distance of the Barlow from
the screen determines the image size. We now build our
SSVs with the Barlow held 12 inches from the screen
and the objective lens is on a holder (focuser)
allowing us to adjust its distance to bring the Sun
into focus. Its distance from the Barlow is about 19
inches and the entire scope is less than 32 inches
long. These parameters give us a 2-inch image of the
Sun which makes this viewer a 5,000 mm telephoto lens
and allows many people to view the eclipse at the same
time.
The current support parts are cut from half-inch plywood but there is nothing special about that choice. We have made the SSV using scavenged cardboard, Elmer's glue, and painters tape. See Figure 7.
The current support parts are cut from half-inch plywood but there is nothing special about that choice. We have made the SSV using scavenged cardboard, Elmer's glue, and painters tape. See Figure 7.

x
In Figure 5 the various parts
of our SSV we are making with kids in workshops are
shown along with their dimensions. The design uses a
Barlow lens (-27 mm) at a fixed distance (12 inches)
from the screen showing the image of the Sun.
Increasing this distance projects a larger solar image
but makes the SSV longer. Using a Barlow lens of
shorter focal length also increases the image size
without increasing the length of the viewer.
Decreasing the projection distance produces a smaller,
brighter image. Our goal for this project was
designing a viewer that was less than three feet long
while producing a solar image one to three inches in
diameter.

Figure 5. The parts of the
Eclipse Science Ambassador Workshops SSV. All wooden
parts except for the guides (D) are cut from half-inch
cabinet grade plywood. The focuser guides are made
from a 6-inch tongue depressor cut in half.
|
A. support rail, 3.5 by 32 inches B. focuser upright, 3.5 by 3.875 inches C. focuser foot, 3.5 by 1.75 inches D. focuser guides |
E.
cardboard lens holder, 3 by 3 inches F. cardboard lens holder, 3 by 3 inches G. Barlow upright, , 3.5 by 3.875 inches H. screen holder, 3.5 by 4.375 inches |
Please note that there is
nothing special about the particular dimensions we
chose except for the approximate spacing of the
lenses. Changing the projection distance changes the
size of the image as does changing the focal length of
the Barlow (the projection lens.) Many different
materials can also be used. We have made
SSVs parts out of sheets of foam insulation and we
made several entirely out of cardboard. Figure 6 below
depicts a Super SSV using a piece of salvaged lumber
and cardboard from a dumpster. The only cost was for
the glue and the lenses. Figure 7 shows an SSV made
from cardboard and tape.

Figure 6. An SSV made with a
scrap piece of lumber and cardboard. This particular
model is our favorite and works as well as the ones
made of plywood. It was our original design for the
Eclipse Science Ambassador workshops but it has to be
glued together in stages with clamping and drying in
between stages and thus requires too much time to be
completed in a workshop. In addition the effort would
exceed the interest and attention of the younger
budding scientists.

Figure 7. An SSV made from the edge of a long cardboard box. This photo demonstrates how really easy these viewers are to make. My optics prof, Dr. Ron Edge (author of String and Sticky Tape physics experiments), would be please by this version. Ten minutes tops to construct this beauty which works as well as the fancy ones. The bottom 6.5 inches are a single piece that slides along the longer piece of the cardboard box holding the 500 mm lens. That movement is for focusing. Once the focus is sharp I fasten the focusing unit in place with binder clips. Is this solar image too small for you? Then make the projection distance larger. If you increase the 6.5 inches unit to about 18 inches you get a 3.5 inch solar disk. Not bad for $6.00 in surplus optics.
x
Below in a table showing a few
possible layouts for the SSV and the solar image size
that results. A solar image of about 2.5 inches is the
minimum we have chosen to for our design.
Our table covers that range with two
different Barlow lenses used in conjunction with an
objective lens of 500mm focal length. A
lens with a focal length of -25 mm is easier to find,
but if you want a larger image than shown in Table II
and you cannot obtain a shorter focal length Barlow
lens, just extend your projection distance and the
length of your SSV. Our supplier listed at the end of
these instructions has a numerous suitable lenses in
the focal length range from -20 mm to -25 mm. Though
remember that surplus lenses may not be replaced when
the stock runs out.
| Table II SSV Lens
Layouts (very approximate values) |
|||||
|
|
|||||
| Barlow focal length (mm) |
Projection Distance (in) |
Solar Image (in) |
SSV Total Length (in) |
||
|
|
|||||
| -25 |
13 |
2.8 |
32 |
||
| -25 |
15 |
3.2 |
34 | ||
| -25 |
17 |
3.6 |
36 | ||
| -25 |
21 |
4.5 | 40 |
||
| -20 |
9 |
2.5 | 28 | ||
| -20 |
13 |
3.5 | 32 |
||
| -20 |
17 |
4.5 |
36 |
||
x
Unlike the 1-lens viewer the
2-lens SSV needs to be supported for aiming but a
tripod is not entirely necessary. Unless an expensive
high-end tripod is available a tripod will have a
small amount of play in the tripod head that will
frustrate the SSV operator. Try what you have to see
if it works for you.
We have found that leaning the SSV against a chair, bench or even a cinder block makes a suitable alternative. See Figure 8. The block is especially useful because it can be situated two ways and cover a range of altitudes from about 15° to almost 90°. If the Sun is lower than 15° we simply elevate the rear of the SSV by placing a book or two under it.
We have found that leaning the SSV against a chair, bench or even a cinder block makes a suitable alternative. See Figure 8. The block is especially useful because it can be situated two ways and cover a range of altitudes from about 15° to almost 90°. If the Sun is lower than 15° we simply elevate the rear of the SSV by placing a book or two under it.

Figure 8a. An SSV in use leaning against a cinder block, our favorite support. The solar image moves as the Earth rotates so the operator must reposition the image over time. We think there is an important lesson in this activity for our younger operators. But if you tire of the constant readjustment on the Sun check out the equatorial mount designed by one of our readers as show later in this section.
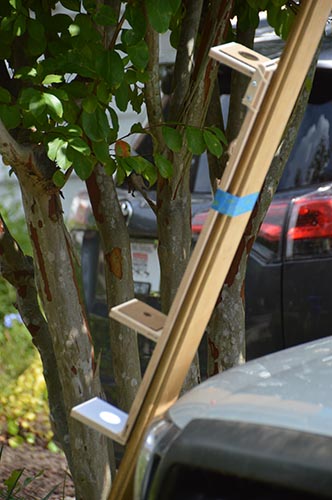
Another easy and functional way to use the viewer is to attach it to a long board and lean the board against a support. Figure 8b shows this approach.
| Figure 8b. This image shows a 2-lens
SSV simply taped to a long board and leaned
against a car as a means of support. Anything
that allows the board to rest at the
appropriate angle can provide the support. |
 |
Yet another way to control the pointing is to use a chair as show in Figure 8c. And then one of our readers, John Dixon, has made an equatorial mount for the SSV. See Figure 8d.
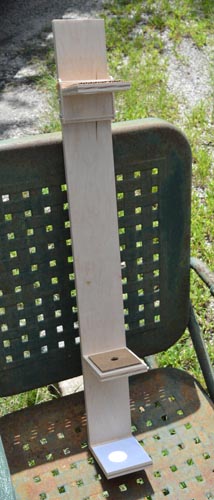 |
Figure
8c. This image shows a Super SSV sitting in
a lawn chair to provide support and assist
in aiming. This simple method works quite
well.
|
| Figure 8d. This image shows
a SSV on an equatorial mount devised
by John Dixon, one of our readers. He uses a
galvanized pipe flange as the polar bearing
and a piece of pipe as the polar axis. I
think it is an ingenious solution to the
problem of tracking the Sun and I and can't
wait to make one myself but only after the
eclipse. See this link for a closeup of the important details. |
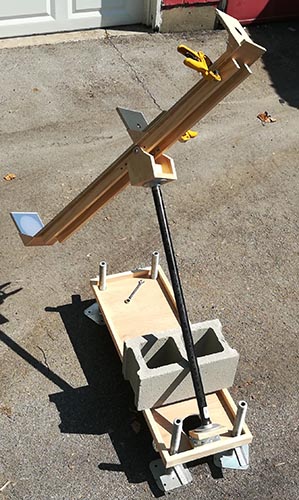 |

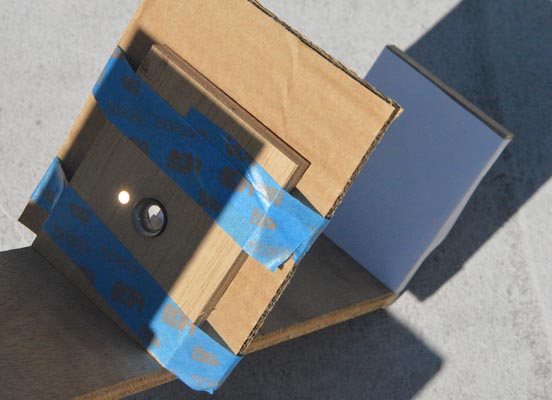
Figure 9. Showing
the method of aiming the Super SSV. The bright
spot next to the Barlow lens is the image of the
Sun. It is an easy adjustment to move the viewer
so that the image falls on the lens. That is all
there is to aiming this viewer. The cardboard
taped to the Barlow support is simply there to
cast a larger shadow and improve the contrast in
the image. A larger board could do the trick but
cardboard is free.
x
Here is the method. Extend the length of the rail by the minimum focusing distance of your camera or smartphone. Where the screen is located replace the upright board with two vertical strips attached to the rail. The reader suggested using the same sort of sticks used as guides for the focuser. Between these uprights attach something translucent such as tracing paper (suggested by the reader) or wax paper (something that has worked well for us in the past). At the back of the rail you will have to devise a means of holding your smartphone or camera. We have used a piece of plywood (just like the screen upright that is no longer used) with a holed drilled for the camera lens at the same position as the SSV lenses to keep things aligned. We glued strips of wood to the back of the plywood to position the smartphone camera lens in the center of the hole and had Velcro or rubber bands to hold the phone.
It may be necessary to enclose the SSV from the Barlow upright to the translucent screen to keep stray light away from of the transparent material to have the best contrast for photography. That is the way our previous version was configured. Scrap cardboard or a mailing tube cut to the right length could do the job. But the solar image might be bright enough that this added step is unnecessary. Again you will have to do some tests. Happy viewing!
 |
Figure 10.
A photograph made with a 1-lens SSV showing the
image of the setting Sun while in eclipse of
Oct. 23, 2014 is in progress. The solar
image is projected onto a sheet of wax
paper and photographed with a DSLR camera
equipped with a closeup attachment. Not only is
the solar disk visible but also the outline of
the horizon with
buildings and a tree on the
left. |
As the eclipse gets closer other options on
lenses might become necessary as suppliers stocks are
depleted. Below is a solution to the Barlow supply
problem from one of our readers, Tom Feller.
"Unfortunately, I came across your pages last week and have been unable to obtain a Barlow lens of the requisite focal length to construct an SSV in time for the eclipse. However, a family member had old eyeglasses in the range of -10 diopters which are progressive bifocals and therefore of varying strength throughout the lens.
I combined one of these -10 lenses with a +1.25 diopter (800 mm focal length) reader lens to make a super SSV. The solar image is 2 to 3 times that of a single +1.25 lens SSV; it shows a solar disc and clouds moving underneath with equal clarity compared to the single lens viewer. I suspect that the progressive prescription along with an astigmatism correction has some impact on image size, quality, and position but this super SSV works and is available in time for the eclipse.
Use of old eyeglass lenses may be a way for some of the people you are working with to enjoy a better view of the eclipse if they have access to surplus lenses that correct for severe myopia."
I think you can see that he has a great idea
with this approach. We have used Barlows as short as
-5.6 diopters (-18 mm fl) so a -10 diopter Barlow
would produce a larger magnification of the image of
the objective than our lenses and make a very compact
SSV.
x
If you have any ideas you want to add to this effort or any questions, please email me (richardsont AT cofc dot edu). I hope you have good weather on eclipse day.
T. R. Richardson